
Reading the markings in a record’s runout groove takes about five minutes once you know the sequence: clean the disc, light the dead wax at a low angle, copy every character exactly as it appears, split the string into its parts, then match both sides against the release records for that label. It is fiddly rather than difficult, and the payoff is being able to tell a genuine first pressing from a reissue, an export pressing or a bootleg that copied the sleeve artwork perfectly.
Most of the trouble people have with this topic comes from expecting a single code to hand over an answer. A runout string is a production record, not a serial number, and each part of it was written by a different machine at a different stage of manufacturing. Once you know which part is which, the string stops being a puzzle and starts being a history.
Updated for October 2026.
Table of Contents
- What You Need to Decode Runout Groove Codes
- Step-by-Step
- Clean the Record and Use Controlled Light
- Transcribe Every Character in Order
- Separate the Code into Useful Components
- Match the Markings Against Release Records
- Verify the Variant and State Your Confidence
- Common Mistakes
- Frequently Asked Questions
- What are runout groove codes on vinyl records?
- Does every vinyl pressing have a runout groove code?
- How can I tell whether a vinyl record is a first pressing?
- Why do two copies of the same album have different runout codes?
- Can runout groove codes prove a record is authentic or valuable?
- Conclusion
What You Need to Decode Runout Groove Codes
The kit is small, and most collectors already own most of it. What matters most is light, because etchings are shallow marks in soft aluminium that disappear completely under overhead lighting.
- A directional light source. A small LED inspection lamp is ideal. A desk lamp with a narrow shade works. A phone torch held low and close to the disc will do, and it is what most people end up using.
- A magnifier. A 5x or 10x loupe or a phone camera held at a fixed distance. Both etched strokes and stamped characters need magnification to separate from surface wear.
- A record cleaning system. A brush with a fluid and a microfibre cloth, or a wet cleaning system if the disc is grubby. You are removing transient dust so it does not sit in the groove shadows and hide the marks.
- A stable surface. A turntable platter, a felt mat or a record crate divider. You will be rotating the disc while holding a light close to it, and a disc that slips on a table top is a disc you will scratch.
- Whatever release information you have. Printed catalogue number from the label, sleeve notes, format, country of the release and the approximate year. This is the reference half of the job.
- Access to a collector database. Discogs is the one most people use, and the method below depends on it. A printed discography works just as well if that is what you have.
One thing to settle before you start reading anything: not every runout marking means the same kind of thing. Some are etched by hand, some are stamped by a machine, some are handwritten on the runout with a grease pencil or marker. And a string that looks full of data may contain nothing but a catalogue number and a side letter.
So go in expecting partial answers. Plenty of perfectly good records carry no country code, no plant identifier and no date. A blank-looking runout does not mean a pressing is late or fake; it means the label chose not to etch one.
Step-by-Step
Clean the Record and Use Controlled Light

Start by getting dust off the surface. Dust is the main reason an etching looks like nothing at all, because it sits in the groove shadows and fills them in.
- Brush before you wet anything. Use the brush along the groove direction with the disc flat on a surface. Hold it by the edges, thumb and finger on the rim only, never on the playing surface.
- Wipe with the cloth, not the fingers. A single pass per section, following the rotation, is enough. Dry grit dragged across a groove is the fastest way to put a permanent mark on a record.
- Let it dry fully before you light it. Any remaining moisture will bounce the light straight back at you.
- Set the light low and to one side. This is the raking light technique and it is the whole trick. Light coming straight down fills every mark; light coming across the disc at a shallow angle throws long shadows from each stroke and letter, which is what makes an etching legible.
- Rotate the disc slowly. Read a short arc at a time, and move the light rather than squinting harder. If a character is ambiguous at one angle it is often clear at another.
- Identify the regions before you read anything. The runout area is the smooth band of unrecorded vinyl between the final audible groove and the label. Matrix marks pressed close to the label on early pressings are sometimes a separate string entirely.
You know the lighting is working when the marks appear to sharpen and darken as you tilt the disc, rather than when they get brighter. Etched characters throw a shadow on one side of the stroke. Machine-stamped characters tend to flash brighter as they pass through the light, because the indentation is deeper and catches it differently.
Check both sides before you conclude anything. Plenty of records have a clear, confident string on side A and a faint or abbreviated one on side B, and that asymmetry is itself a useful clue.
Transcribe Every Character in Order
Write the string down as you see it, before you interpret a single part of it. Interpretation is what introduces errors, so copy first and read later.
Things to get right while copying:
- Letters versus digits. A zero, the letter O and the letter D can be near-indistinguishable in a faint stamping. An eight and a B sometimes are too.
- Symbols. Stars, asterisks, plus signs, crosses and slash marks are all in use and each plant has its own habit. A slash may be a single stroke or a double slash, and collectors write both as // and ///.
- Mirrored characters. A mark read as a reversed or mirrored letter usually means the stamper was engraved for one side and read from the other, or the record has been photographed flipped. If a character only makes sense as a mirror image, write what it looks like and note the possibility rather than silently correcting it.
- Spacing. Gaps are meaningful. A tight cluster and a widely spaced string can be two different markings on the same side.
- Uncertainty. Write a bracketed question mark for anything you cannot settle. A transcription of X?EX 589 is more useful than a confident guess of XEX 589, because it tells the next search exactly where to look.
Work from the outside of the runout toward the label, and separately from the label outward on the other side. Markings are often arranged so that reading order moves across the two sides, and reading them both from the same direction confuses the sequence.
Record the style as you go: hand etched, machine stamped, handwritten in marker, or a mixture. On EMI and other British issues it is common to find a machine-stamped matrix with a hand-etched addition alongside it, and the addition is usually the more informative half. A handwritten note is strong evidence of a bespoke cut or a special stamper, but handwritten does not automatically mean earlier.
When both sides are copied, you have something searchable. In practice, pasting a copied runout into a database search is often faster than searching by album title, because the title returns every pressing ever made and the runout returns the specific one.
Separate the Code into Useful Components
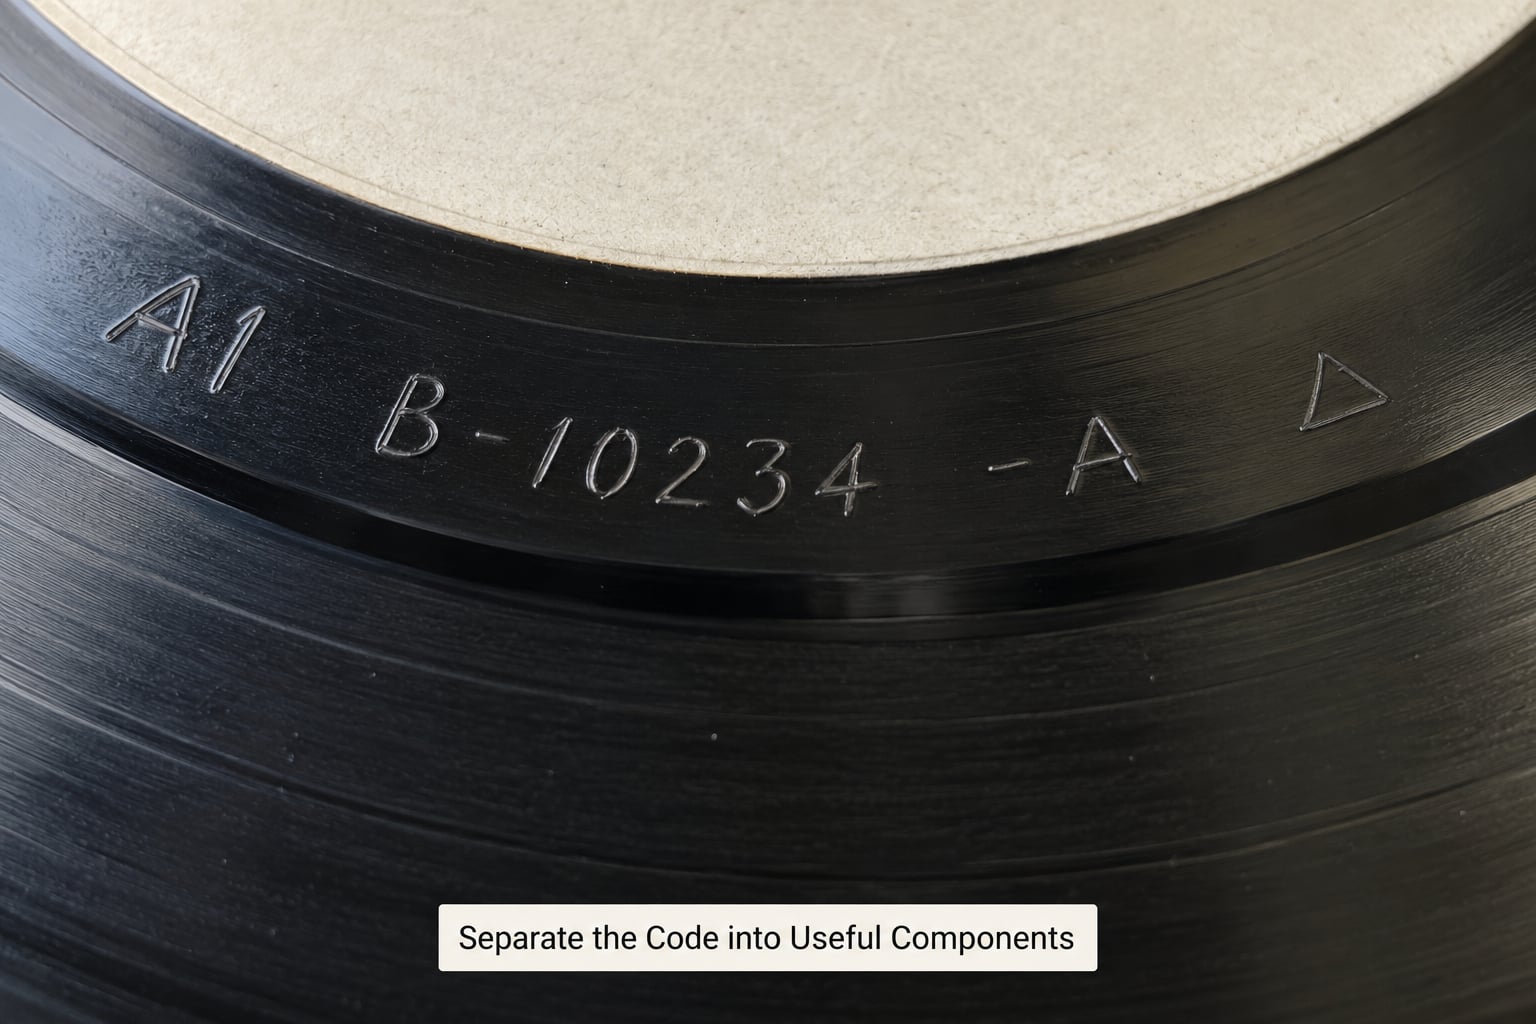
Now break the transcription into pieces. The split is not identical across labels or countries, so treat the table below as a set of possibilities rather than a fixed key, and let corroborating evidence decide where each boundary falls.
| Component | Example | What it usually tells you |
|---|---|---|
| Label or house prefix | ST- | The pressing house’s own number format, which identifies the label and often the era |
| Catalogue number | 712285 | Matches the number printed on the label; confirms you are reading the right record |
| Side marker | A | Which side you are looking at, sometimes written as A1 or A-1 |
| Matrix or cut number | 1 | Which lacquer disc was cut; a higher number on the same format usually means a later cut |
| Engineer initials | RL | The cutting engineer, where the label credits them in the runout |
| Handwritten signature | A PORKY PRIME CUT | A named cutter’s own inscription, common on British 7-inch singles |
| Mastering or parent mark | 1Y//1 | A metal master identifier; downstream of the lacquer cut |
| Stamper code | G-1 | The stamper and, where codes were allocated, the pressing plant |
| Inspection or plant symbol | triangle, diamond | Quality control marks; shapes vary by plant and by decade |
The crucial distinction sits in the last three rows. A matrix number belongs to the lacquer cut, the master belongs to the plating stage, and the stamper code belongs to the pressing stage. They describe three different objects made at three different times, often in three different buildings, and only the first one is useful for dating.
Then write the whole thing down in a form you can reuse. This is the copy template, and filling it in takes a couple of minutes:
- Artist and title as printed:
- Label and printed catalogue number:
- Format and speed:
- Side A runout as copied:
- Side B runout as copied:
- Etched, stamped or handwritten:
- Label and sleeve details worth noting:
- Likely plant:
- Likely cut:
- Confidence: confirmed / probable / possible / unresolved
Keeping this for every record you inspect turns a one-off reading into a running record of your collection, and it is the fastest way to answer “why do my two copies differ?” later.
Match the Markings Against Release Records
Open the release entry for the label and catalogue number you transcribed, then compare several features at once rather than searching for one perfect string match.
- Search by runout first. The dead wax is more specific than the title. Where the entry is listed under several variants, try the string without the plant mark, then add it back.
- Confirm the broad release traits. Does the entry’s label design match yours? Country, format, speed, gatefold or sleeve type, and release year should all sit comfortably alongside the code you read.
- Compare both sides. Entries normally list a matrix per side. A side-one match with a side-two mismatch may mean an undocumented variant, a mixed set, or a misreading on your part. Check your transcription of side B before assuming anything unusual.
- Read the notes. This is where the plant, the stamper, the sleeve variant and the odd one-off detail get described. Undocumented mothers and stampers are often mentioned here even when they are not in the matrix field.
- Check label variants too. Some releases changed label design between batches. A runout that does not appear anywhere may belong to a variant with fewer contributions.
If a search returns nothing at all, widen before you widen the reading. Drop the plant mark, drop the engineer initials, try the string with and without slashes, and try the character groups separated the other way round. Only after those attempts should you suspect you have misread something.
Verify the Variant and State Your Confidence
Runout data is one strand of evidence among several. Cross-check it against what else the record can tell you.
- Dead wax variations. Some copies of the same pressing carry a different master or stamper mark. Documented variants are normal; an undocumented one is a reason to phrase your conclusion carefully.
- Label details. Print colour, ring size, logo position, and any code printed on or near the label. A British tax code, for example, sits on the label rather than in the runout, but it corroborates the country and era of the cut.
- Sleeve and insert. Printer credits, catalogue numbers on the spine, and any matrix or master reference printed on the inner sleeve or on the record’s own packaging.
- Track listing and credits. Timing differences, split tracks and mixing notes often distinguish one cut from another, and they cost nothing to compare.
- Discography ranges. Where a catalogue entry gives a span of possible cut numbers for a release, your reading sits somewhere in it.
Then say what you actually know, in the plain words collectors use:
Confirmed means the entry documents your exact string on that side and the label details agree. Probable means the label, catalogue number, format and one side match with the other side undocumented. Possible means the general runout matches but you cannot align every segment. Unresolved means the record is unusual, undocumented or partly illegible, and further evidence is needed.
One situation deserves naming on its own. When the matrix itself is early but a separate master or stamper mark was added later, that combination usually points to a repress from an existing cut rather than a fresh cut. The matrix tells you the cut is original; the additional mark tells you this copy was pressed after the first run. Both facts are true at once, and collectors who report only the first are overstating what the disc is.
Common Mistakes
Reading mirrored characters as normal ones. Some marks read correctly only when flipped. Write what you see, note the flip, and check whether the mirrored reading matches a documented matrix before rejecting it.
Assuming every matrix code names an engineer. Initials often do identify a cutter, but many codes are house numbering with no person attached at all. If the label never credited a cutter, do not attach a name to the code.
Treating a plant code as a country code. Stamper codes identify a stamper and sometimes a plant; country is normally inferred from the label design, the tax code and the release entry, not read straight off the runout.
Ignoring which side you are looking at. Both sides carry markings and they are rarely identical. Copy each side separately, in its own line, before you start comparing.
Searching by an incomplete transcription. A partial string will either return nothing or return the wrong release, and both results are misleading. Transcribe fully, mark your uncertainties, and search variations deliberately rather than guessing once.
Treating the dead wax as proof of authenticity. Copies reproduce runout strings, sometimes perfectly. The dead wax tells you which pressing a record claims to be; it does not certify that the pressing is genuine or that the record is complete.
Expecting the etching to be in a fixed position. Some labels etch near the label, some drift outward as the stamper wears, and some place the string across the trail-off between two visible marks. Find the string by pattern, not by location.
A few habits worth keeping: inspect both sides every time, photograph the runout before you put the record back in its sleeve, and record what you read in the template above. Most record store staff and sellers will hold a disc up to a torch without being asked, and it settles an argument in about ten seconds.
Frequently Asked Questions
What are runout groove codes on vinyl records?
Runout groove codes are the characters etched, stamped or handwritten into the smooth band of vinyl between the final music groove and the centre label, also called the dead wax or trail-off. They record production data: a catalogue number, a side marker, a cut number, sometimes an engineer signature, a master and stamper mark, or a plant symbol. Each part was added at a different manufacturing stage.
Does every vinyl pressing have a runout groove code?
No. Plenty of records were pressed without any matrix markings at all, and others carry only a catalogue number and a side letter. Some labels left the runout blank for years and used it sporadically afterwards, so the absence of a code tells you very little about age or origin on its own. Where markings exist, they may be machine stamped, hand etched, handwritten, or a combination of all three.
How can I tell whether a vinyl record is a first pressing?
You cannot tell from one character. A low cut number on side one, an early master mark and a runout that matches an early release entry all point the same way, but parallel cuts at another plant, delayed use of an unused mother, and export or contract pressings all produce low numbers on later copies. Treat first pressing as a conclusion you reach from the runout plus label, sleeve and discography evidence, never from the runout alone.
Why do two copies of the same album have different runout codes?
Usually because they are different pressings. One may be an earlier cut and the other a later one, or they may come from different plants, different stamper generations, or different mastering engineers in an export version. Records also vary within a single pressing, because a stamper wears through its life and can leave a slightly different mark on later copies. Discogs usually documents these as separate variants or notes them in the entry.
Can runout groove codes prove a record is authentic or valuable?
No. A runout identifies the pressing a record claims to be; it does not certify that the record is genuine, complete or valuable. Bootlegs and counterfeits reproduce dead wax strings, sometimes copied exactly from a genuine copy. Collectors use the runout alongside label printing, sleeve condition, matrix wear, weight, and the documented variants for the release before drawing any conclusion about authenticity or value.
Conclusion
Start in this order: clean the disc, light the dead wax at a low raking angle, and copy every character from both sides before you interpret anything. Mark your uncertainties rather than smoothing them over, then split each side into catalogue number, side marker, cut, engineer mark, master, stamper and plant.
Search by the copied runout before you search by title, and compare both sides against the release entry rather than the one side that matched. Where a master or stamper mark sits alongside an early matrix, treat the matrix as dating evidence and the added mark as evidence of a later pressing.
The strongest identification is never the dead wax on its own. It is the runout plus the label printing, the printed catalogue number, the sleeve and the discography agreeing with each other, with a stated level of confidence at the end.