Yes, you can print and staple a zine at home with a normal printer, ordinary paper and an office stapler. The whole job is three things: print the pages double-sided with the flip set to the short edge, fold the stack in half, then staple through the middle spread. Get those three right and a first run takes about twenty minutes.
The detail that trips up most first-timers is page order. Print with the default long-edge flip and every sheet comes out with its back on the wrong side, so the finished booklet reads inside-out and roughly backwards. Everything below is built around avoiding that one failure.
Table of Contents
- What You Need
- Core supplies
- Which binding you are actually making
- How to Print and Staple a Zine at Home: Step by Step
- Prepare and Check the Zine Pages
- Choose the Right Paper and Printer Settings
- Print a Test Copy and Check the Layout
- Print and Assemble the Full Run
- Fold the Pages Into a Zine
- Staple the Zine in the Correct Position
- Trim, Finish, and Check the Zine
- Common Mistakes
- Frequently Asked Questions
- Can I make a zine with a regular home printer?
- What paper weight should I use for a homemade zine?
- How do I print a double-sided zine without reversing the pages?
- How many pages can I staple together for a zine?
- What is the best way to fix a crooked or weak staple?
- Conclusion
What You Need
You need a computer with the zine file, a printer, paper, a stapler, and a straight edge. That is genuinely the list. Nothing here requires commercial equipment, and a cheap inkjet produces a perfectly acceptable zine — rough toner or slightly heavy ink is part of the DIY look rather than a flaw.
Core supplies
- A print-ready PDF or design file. The pages must already be laid out in booklet order, not as separate reading pages.
- A printer with double-sided printing. Duplex is not strictly essential, and there is a one-sided workaround below.
- Paper. 20lb to 26lb plain paper folds cleanly and runs through every home printer. 80lb cardstock is a cover-only material.
- A stapler. A standard desktop stapler handles zines up to about 8 pages. Beyond that you need a long-arm stapler or the cardboard trick.
- A ruler and a pencil for marking the fold and checking the spine line.
- Scissors or a paper cutter for optional trimming of uneven edges.
- A bone folder, the back of a butter knife, or an unmarked ballpoint pen to sharpen the crease.
Which binding you are actually making
Almost every small zine is saddle-stitched: sheets folded in half and stapled through the fold. It is the method described here. A staple-bound block is a different thing — pages folded separately, stacked, and stapled along one edge — and it only suits zines with a firm spine. If you plan to write in yours or stand it up on a shelf, tell your printer to deliver loose folded sheets and bind it that way instead.
Paper weight matters more than most guides admit. Below 18lb the fold tears and the crease slumps; above 30lb an inkjet often doubles up and refuses to feed. For the interior, 20lb to 26lb is the sweet spot. For a colour or cardstock cover on a special run, 65lb cardstock works, though check your printer can handle it before designing a whole issue around it.
If you have no printer at all, your public library almost always offers printing, many libraries and makerspaces keep a long-arm stapler you can borrow, and any copy shop will print a PDF at a per-page rate. Zine distros and friends with a laser printer are also worth asking.
How to Print and Staple a Zine at Home: Step by Step
Prepare and Check the Zine Pages
Export your zine as a print-ready PDF with the pages already imposed — laid out two-up on each sheet so they fall into reading order after folding. You can tell an imposed file by looking at it: the back cover sits on one outer panel, page 1 on the other, and a single file page holds two consecutive zine pages. A file set up for reading on screen looks nothing like this.
Confirm the finished size before you print anything. Letter stock gives a half-letter zine of 5.5 by 8.5 inches. A4 stock gives an A5 zine. Letter and A4 are different shapes and are not interchangeable, so a zine designed for A5 will print with awkward margins on Letter, and the text often ends up a shade small.
Page count has to be a multiple of four, because one sheet carries four pages once folded. An 8-page zine is 4 file pages, 12 pages is 6, 16 pages is 8, and a 32-page zine is 16 file pages. If your count lands on 10 or 14, pad with a blank or a fun page rather than fighting the fold.
Now check margins and images. Most home printers leave an unprintable margin of a quarter inch or more on each edge, so keep all text and important images inside a half-inch border. Nothing should cross the fold line either — text running through the spine will be unreadable in a stapled zine. Photos should sit at roughly 300dpi, which on a half-letter page means about 1650 by 2550 pixels.
Make a one-page test print before you copy the run. Print page 1 of the file and check the edges and ink coverage. It costs one sheet and saves a whole run.
Choose the Right Paper and Printer Settings
Set the printer to double-sided, then look for the binding or flip option. Choose flip on short edge for portrait single-sided zines. Flip on long edge is the factory default on most printers and it is wrong for a folded booklet, because the back lands rotated instead of aligned. If your printer dialogue calls it two-sided long edge or binding position, the same idea applies: the sheet turns around its short side.
Turn collate on. Without it, a 50-copy run prints every copy of page 1, then every copy of page 2, and you end up sorting fifty stacks by hand. Turn greyscale on for interior pages to stretch the ink. Set scale to actual size or 100 percent rather than fit to page, or your zine comes out shrunk with strange margins. Keep orientation portrait.
Then turn off anything automatic that will fight you: no booklet mode if your imposition is already correct, no double-printing of heavy pages, no automatic page flipping if your driver treats the sheets as bound.
Print a Test Copy and Check the Layout
Print one complete copy of the zine — one sheet, both sides — and put it on the table before you print anything else. Fold it in half, open it out and read it page by page.
Look for four things. The reading order should run from the page with page 1 on it, starting from the bottom panel of one side and moving up and across. No text should be clipped by the printer edge. The fold should land in blank space, not through a headline. And the black areas should look solid rather than streaky or grey, which is a sign of a low ink level or a photos-versus-text contrast problem.
If pages read backwards, your flip setting is wrong. If content runs off the edge, shrink the content by a few percent or move it inward. If the fold cuts through text, you need a wider gutter — half an inch minimum — and that means an edit to the PDF.
Print and Assemble the Full Run
Print the number of complete copies you need, each one starting from file page 1. If your printer has a copies setting, set it there and let collate handle the rest.
Sort and stack the finished sheets as they come out, keeping the orientation consistent. A mixed pile of upright and upside-down sheets is the usual reason a run fails to line up at the fold stage. If your printer double-feeds on 20lb paper, print one sheet at a time or lower the number of copies and repeat.
Let heavy ink or toner sit a minute before folding. Rushing this is how you get a crease smeared across a dark cover.
Fold the Pages Into a Zine
Take the whole stack and square the edges by tapping them on the table. Fold the first sheet in half lengthwise so the printed content faces inward, with the fold on one side and the open edges on the other. Use the ruler to make the fold line straight.
Crease firmly with the bone folder, the back of a butter knife, or the barrel of an unmarked pen, running along the fold from one end to the other. A crisp crease matters more than a tidy one — a loose fold is what lets pages slip out of reading order later.
Fold the remaining sheets the same way and nest them. Then check the whole thing once: flip through from the back cover to the last page and confirm the sequence. Flatten the folded stack with your palm before you staple.
A quick trick worth knowing: take one scrap sheet, fold it into the same panel shape, write the page numbers in each panel, unfold it, and keep it beside your keyboard as a template. It beats re-deriving the layout every time.
Staple the Zine in the Correct Position
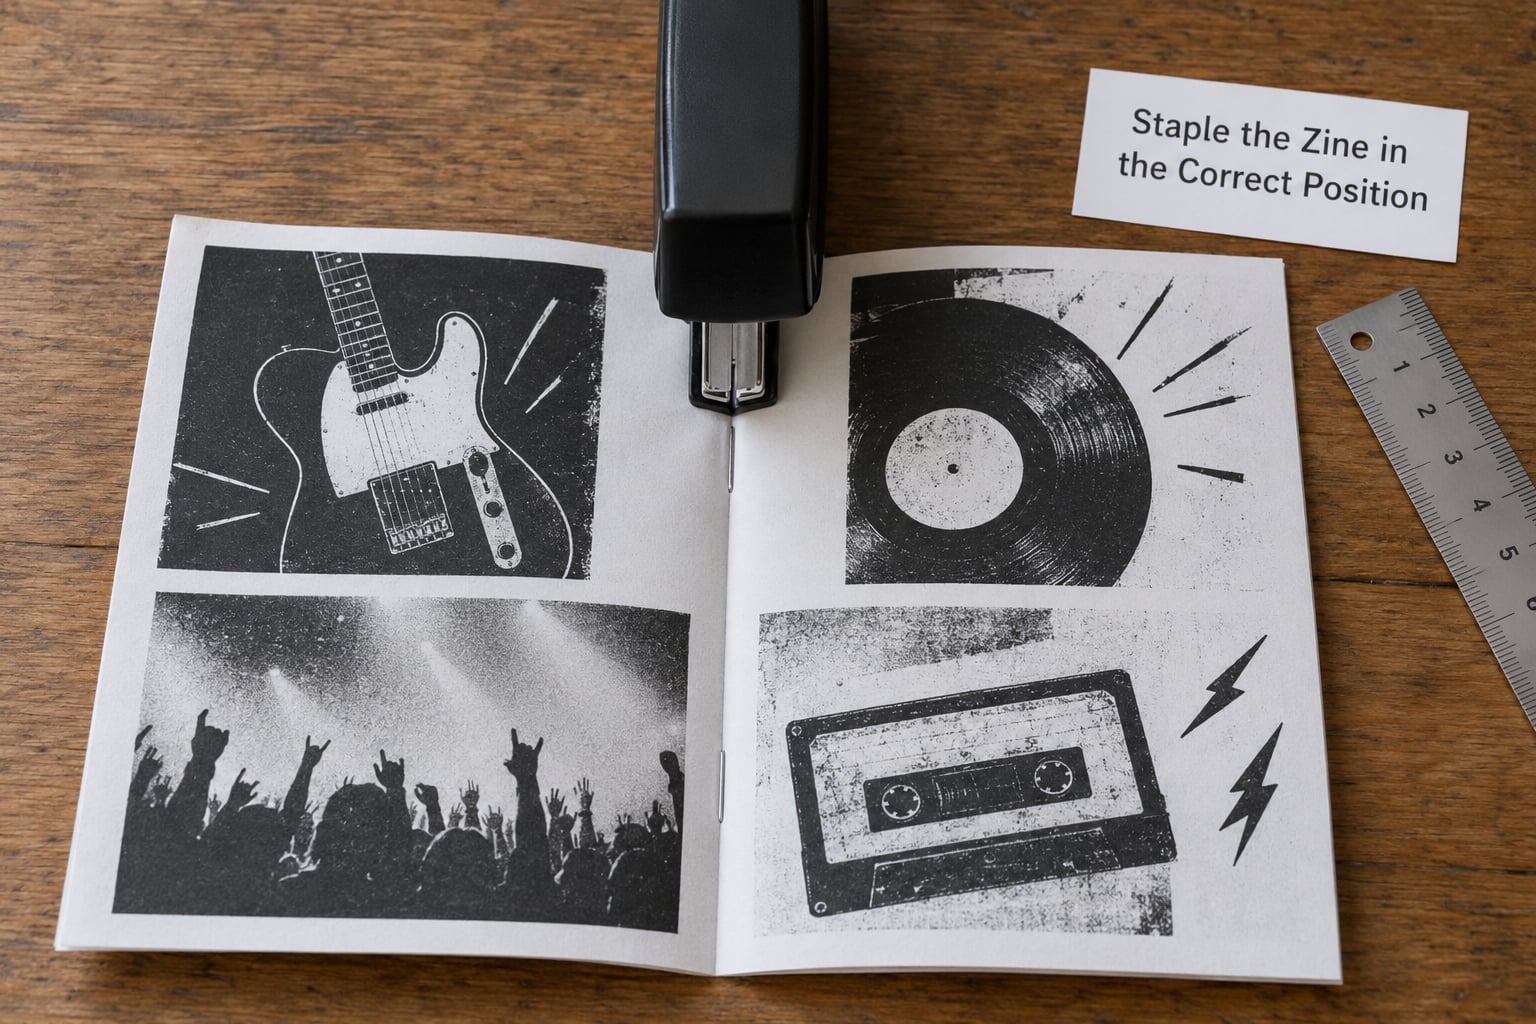
Open the folded stack to the middle spread so the spine lies flat and both covers face up. Do not staple through a closed folded zine — that is how the fold gets crumpled and the cover bends.
Drive two staples through the crease, one about an inch from the top edge and one about an inch from the bottom. Both should sit just inside the fold line, close enough that the legs land within the spine and never so far out that the crown shows on the cover. A third staple in the middle is only worth adding on a 24- or 32-page zine where the spine is heavy.
If you only own a short desktop stapler, slide a piece of corrugated cardboard or stiff card under the spine, open the stapler arm, rest it on the fold, then strike the top of the arm down firmly. Tap the finished staple flat with a hard flat surface afterwards. A long-arm stapler, the type with a thin vertical post under the head, does the same job without the pounding; libraries and makerspaces frequently lend them.
Check the staple by flexing the booklet gently. If it springs open, add a second staple closer to the fold or use a heavier staple.
Trim, Finish, and Check the Zine
Trim the open edges if they are ragged, cutting a few millimetres from all three sides and staying clear of the staples. Some makers leave the rough edge alone, which is a legitimate look.
Add a cover wrap or a strip of tape along the spine if you want the copies to survive a table. Then read one finished copy start to finish. That last read catches page-order problems that a spot check misses.
Store copies flat or upright with the spine inward. Never shelve them fold-down — the crease takes a set and the pages open crooked.
Common Mistakes
Almost every bad zine comes down to one of the faults below. Most are diagnosed in under a minute once you know what the symptom looks like.
| What went wrong | Cause | Fix |
|---|---|---|
| Pages read backwards or inside-out | Printed with flip on long edge | Switch to flip on short edge and reprint one test copy |
| All copies of page 1 print, then all copies of page 2 | Collate turned off | Turn collate on, or print one sheet at a time |
| Content clipped at the edge | Artwork sits inside the printer unprintable margin | Scale to actual size and keep content half an inch from every edge |
| Text too small, odd margins | A5 or A4 layout printed on Letter paper | Print A4 files on A4 paper, or rebuild the zine at half-letter |
| Fold runs through a headline | Gutter too narrow | Add a half-inch margin on both sides of the fold line |
| Staple visible on the front cover | Stapled through the wrong side or too far from the fold | Open to the middle spread and staple just inside the crease |
| Staple stops halfway through | Stack too thick for the stapler or staple depth | Switch to a long-arm stapler, use the cardboard backing method, or reduce the page count |
| Folded pages drift out of order | Loose crease or sheets nested inconsistently | Crease every sheet with a bone folder and square the stack before stapling |
| Edges smeared or streaky black | Low ink or toner, or folded too soon | Check ink levels and let the print sit a minute before folding |
| Cover text unreadable on colour paper | Dark paper with thin ink coverage | Switch to a light paper or print the cover in white on a dark sheet |
Two design rules prevent most of this before it starts. Keep a half-inch gutter on either side of the fold so no text crosses the spine, and never let a photo run full bleed across a fold line — a saddle-stitched zine has no gutter to hide the crease. Also check that your inkjet can feed the paper weight you chose; a double-fed sheet is wasted because a misprinted zine page has no scrap use.
Frequently Asked Questions
Can I make a zine with a regular home printer?
Yes. Any printer that can print double-sided will do, and a cheap inkjet is fine. What matters is the print dialogue rather than the machine: set two-sided printing to flip on short edge, turn collate on, set scale to actual size, and print one complete test copy before you print the run. Colour laser gives cleaner text, but a home inkjet with slightly heavy black areas is entirely normal for a DIY zine.
What paper weight should I use for a homemade zine?
Use 20lb to 26lb plain paper for the interior pages. It folds without tearing, holds a crease and runs through almost any home printer without double-feeding. Go heavier, 65lb cardstock, only for a cover on a small special run. Much lighter paper tears along the fold, and anything above 30lb will defeat the paper feed on a lot of home printers, so test a single sheet first.
How do I print a double-sided zine without reversing the pages?
Set double-sided printing to flip on short edge for a portrait, single-sided booklet. The default flip on long edge rotates the back of the sheet, which lands every page reversed. If your printer driver phrases it as binding position or two-sided long edge, choose the option that turns the paper around its short side. If pages still come out wrong, print a single sheet and fold it to check before reprinting the run.
How many pages can I staple together for a zine?
A standard desktop stapler comfortably handles up to 8 pages, or two folded sheets. A long-arm stapler reaches roughly 25 sheets, which covers a 48-page zine. Between those limits, place a piece of corrugated cardboard under the spine, open the stapler arm, rest it on the fold and strike down firmly, then tap the staple flat. Past 32 pages, stitch binding or a stapled block usually holds better.
What is the best way to fix a crooked or weak staple?
Pull the old staple out, square the folded stack again, and re-open the booklet to the middle spread so the spine lies flat. Drive two staples about an inch from the top and bottom edges, straight and close to the crease, rather than one in the middle. If the staple keeps stopping short, the stack is too thick for that stapler, so switch to a long-arm model or add a third staple in the middle.
Conclusion
Export your PDF with the pages imposed and the count a multiple of four. Print exactly one complete copy, fold it, read it, and fix whatever is wrong. Then adjust the staple position on that single copy until the spine holds. Only then do you print the full run.
That is genuinely all it takes to print and staple a zine at home: a printer, plain paper and a stapler. Self-publishing on your own terms, in numbers too small for a print house to bother with, is exactly why zines work at all.